The market does not move randomly. Behind sharp impulses lies the money of major players: banks, funds, market makers, and algorithms. They cannot open a huge position with a single order, so they buy or sell in parts. As a result, characteristic points appear on the charts – bases, where the price pauses and then sharply moves in one direction.
Sam Seiden, one of the most famous proponents of supply and demand analysis, based his methodology on these traces. He identified four key models:
- RBD – Rally-Base-Drop (supply, reversal model).
- RBR – Rally-Base-Rally (demand, continuation model).
- DBR – Drop-Base-Rally (demand, reversal model).
- DBD – Drop-Base-Drop (supply, continuation model).
Schematically and visually, it looks like this:
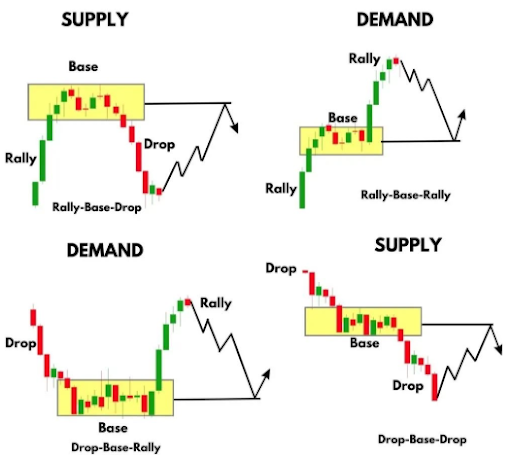
Sam Seiden explained that institutional traders (banks, funds) cannot enter the market immediately for the entire amount – they do so in stages. The base is precisely the zone where they accumulate positions, creating a balance between supply and demand. An imbalance occurs when the price leaves the base and begins to move purposefully in one direction. If, after the base, the price truly begins to move upward, then the base will be demand. Conversely, if, after the base, the price began to move downward, then the base will be supply.
How To Use These Models?
It’s not complicated.
- Wait until the price is determined and impulsively fixed (mandatory) above or below the base.
Why is impulsively a prerequisite? Because impulse (big full candle) is a sign of an emerging imbalance, when the price accelerates due to a large preponderance of market orders on one side.
- Wait for the price to pull back to the upper boundary of the base if we have DBR or RBR, or to the lower boundary of the base if we have RBD or DBD.
- Cancel the base if the price goes beyond the middle of the base or if the price goes beyond the maximum accumulated volume of the base (POC – point of control). This is for placing a stop-loss order.
- Wait for confirmation in the form of a price reaction to the base. As a rule, this is a sharp price rejection. The price is unwilling to consolidate in the base area. Price action will help you here: pin bars or engulfing bars. You can use other confirmations as well. We have only given the simplest example.
- Profit targets are usually opposite zones. For example, if you opened a buy position from DBR, your first target would be DBD, and your main target would be RBD.
Additionally:
The DBR and RBD models are considered stronger because the intentions of major market players have changed at their base.
The RBR and DBD models work well with the trend when the price has not yet reached the opposite zone. But if a reversal pattern has formed, then RBR and DBD will, at best, only give a rebound, and at worst, will be broken. This is precisely because reversal patterns are stronger than continuation patterns.
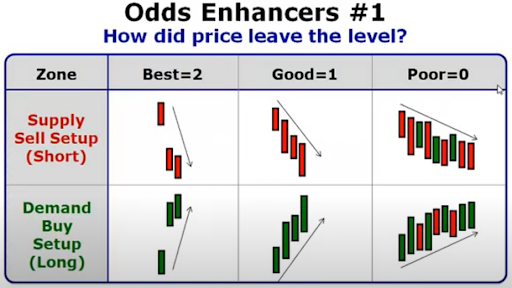
In his work, Sam Seiden also identified four odds enhancers that help to understand how models are stronger or weaker. These enhancers are:
Odds Enhancer #1. How Did the Price Leave the Level?
Lesson: the stronger the move away from a base, the more out of balance supply and demand is at the level. In other words: the faster the price moves away from the base, the stronger the level.
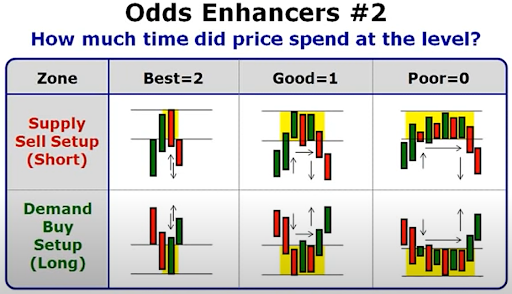
Odds Enhancer #2. How Much Time Did the Price Stay at the Level?
Lesson: the less time price spends at a level, the more out of balance the supply and demand are at the level. In other words, the strongest levels are where the price spends the least amount of time.
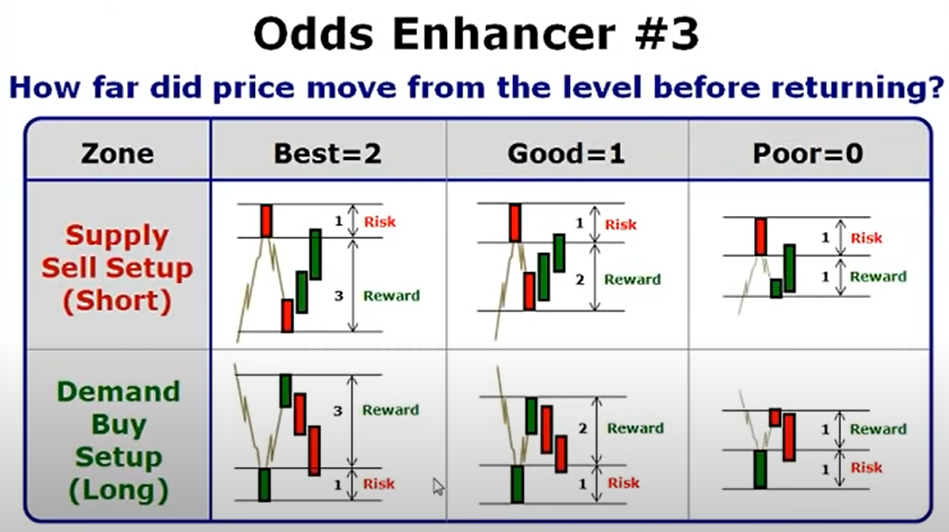
Odds Enhancer #3. How Far Did the Price Move From the Base Before Returning?
Lesson: the farther price moves away from a level before returning, the larger the profit margin potential and the probability of a successful trade. In other words: if the price immediately tests the base after the impulse, it is a weak base. Conversely, if the price does not return to the base after the impulse but continues to move further, it is a strong base.
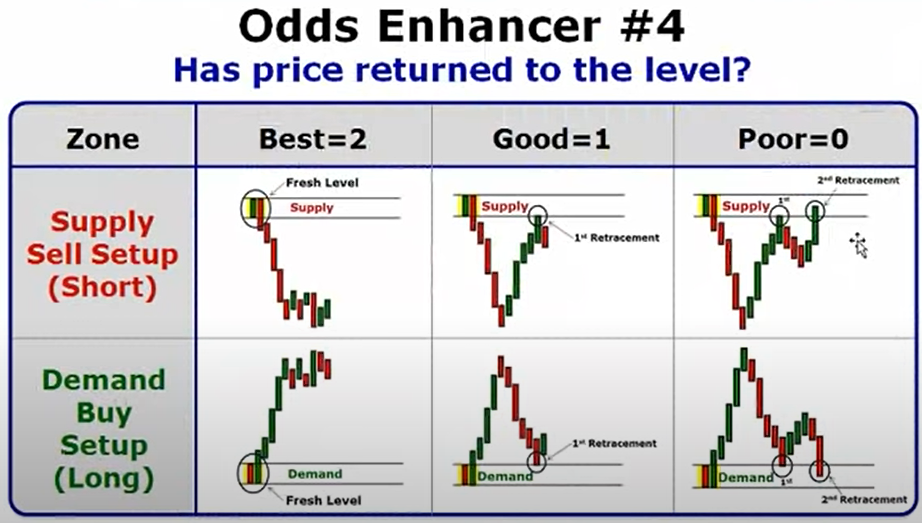
Odds Enhancer #4. Has the Price Returned To the Level?
Lesson: the fresher the level, the higher the probability that the price will turn at that level. In other words, the first test of the base is the best entry point. If the base is tested several times or the price is pushed to the boundaries of the base, there is no imbalance in this case and this level should no longer be used.
Which Time Frame Is The Base for This Approach?
The author himself uses this method on time frames from M30 and above. However, given the fractal nature of the market, this method can also be used on lower timeframes, down to M1-M5.
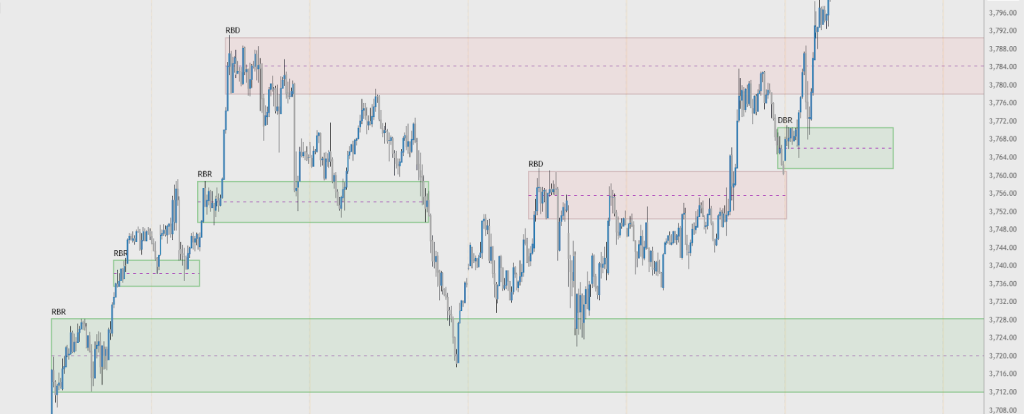
Chart Example: XAUUSD – M15 Time Frame
Final Word
The method for determining supply and demand is not just a pretty diagram. It is a working tool that shows where real transactions are taking place in the market. Sam Seiden has given us the key to understanding the behavior of major players. If you learn to find these zones, your trading will become more accurate and confident.

